Where to Mount your Golf Simulator Projector – Pitfalls + Example Placements
Posted in Projectors, Room Setup
Mounting your projector is one of the trickiest parts of golf simulator planning—and one of the most important. Get it wrong and you’ll fight with shadows, misaligned images, or even risk hitting the projector. Get it right and you’ll enjoy a crisp, immersive image that stays out of the way of your swing.
The ideal golf simulator projector placement balances three key principles:
- Safety and clearance – the projector must sit out of your swing path and away from potential ball strikes.
- Image quality – the lens should be positioned so the projected image fills your screen without shadows or distortion.
- Throw ratio matching – the projector’s throw ratio must align with your room’s throw distance to deliver a perfectly sized image.
👉 In most 2025 setups, that means ceiling mounting a short-throw projector 8–14 feet from the screen, directly above and behind the hitting area. But floor mounts with protective enclosures and tall tripods are also viable in certain spaces.
Problem: You’ve researched, bought, and installed your projector. You’re ready to take your first swings in your new golf simulator—only to find your shadow is cast across the screen or, even worse, your swing connects with the projector itself.
Solution: These mistakes are common, but they’re completely avoidable with the right planning. Drawing on my own simulator setup, in-depth projector research, and the lessons of countless other golf sim owners, I’ll walk you through exactly where to mount your projector for the safest, clearest, and most immersive experience.
👉 Keep reading to learn the best mounting options—and how to avoid the pitfalls that can ruin your setup.
What is a projector throw ratio and what does it mean for my projector placement?
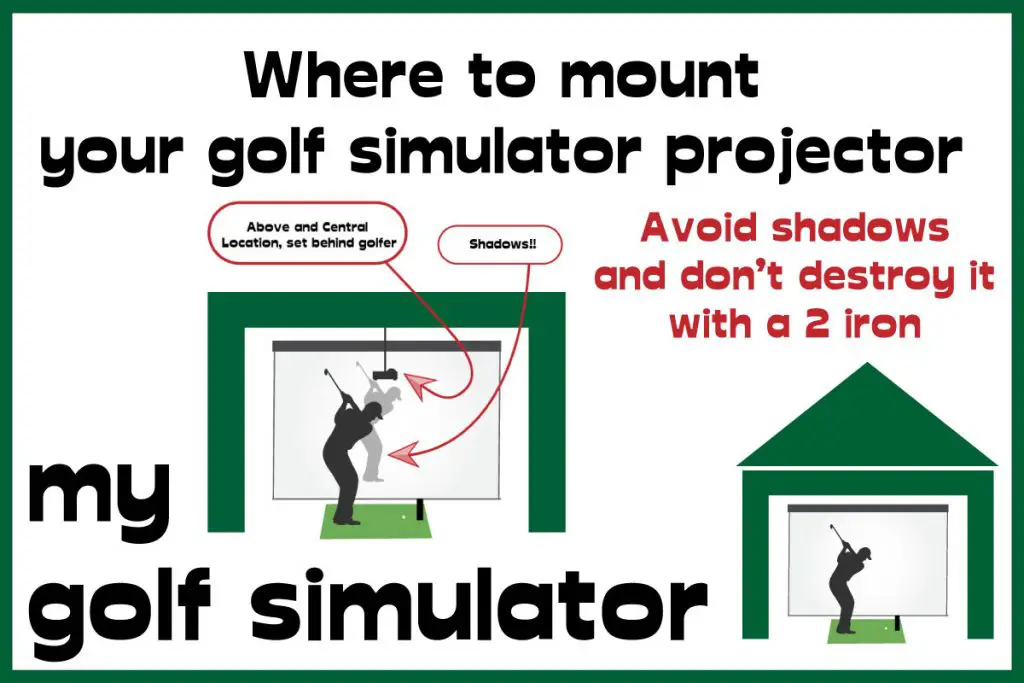
The throw ratio is the relationship between the throw distance (projector to screen) and the horizontal image width.
For example:
- A projector with a 2.0 throw ratio needs to be 2 feet away for every 1 foot of image width.
- To project a 10-foot-wide image, the projector would sit 20 feet back.
Most golf simulators use short-throw projectors with ratios in the 0.4–0.8 range, meaning they can create a 10-foot-wide image from just 4–8 feet away. This is critical in simulator rooms where space is limited, and you need to avoid casting shadows.
👉 While long-throw projectors exist (ratios 1.5–2.5+), they aren’t suitable for golf simulators because you’d need impractically large rooms to get the right image size.
Throw Ratio Quick Reference for Golf Simulators
| Projector Type | Typical Throw Ratio | Distance Needed for 10 ft Screen Width | Suitability for Golf Sims |
|---|---|---|---|
| Ultra-Short Throw (UST) | < 0.4 | 2.5 – 4 ft | ✅ Possible option for tight spaces, but will be vulnerable to flying golf balls and image clarity is a potential issue |
| Short Throw | 0.5 – 1.0 | 5 – 10 ft | ✅ Best choice for most golf simulators (balance of space + clarity) |
| Standard Throw | 1.0 – 2.0+ | 10 – 20+ ft | ❌ Most are impractical for home simulators (room usually too short), issues with shadows |
👉 For most home setups, a short-throw projector around 0.5–1.1 ratio is the sweet spot.
Zoom Lenses and Throw Ratio Flexibility
Some projectors include a zoom lens, which lets you adjust the image size without moving the projector. These models tend to cost more but can be very handy if your throw distance and throw ratio don’t quite line up—giving you some flexibility without having to remount.
What Does This Mean for Your Simulator Setup?
- Standard-throw projectors usually need to sit too far back for most home simulator rooms, even with zoom adjustment.
- Ultra-short throw (UST) projectors can create huge images from just a few feet away, but in a golf sim this often places the unit too close to the ball strike zone, raising safety and visibility concerns.
- Short-throw projectors hit the sweet spot: close enough to avoid shadows, far enough to stay safe, and widely available at reasonable prices.
👉 For most golf simulators, the ideal range is a short-throw projector with a throw ratio of around 0.5–1.1. This gives you flexibility to fill typical 10–15 ft wide screens while keeping the projector safely mounted above or behind the hitting area.
Take a look at the throw ratio and related features of our recommended golf simulator projectors here.
| Projector Model | Buy Now | Resolution | Lumens | Throw Ratio | Contrast Ratio | Aspect Ratio (Native) | Aspect Ratios (in settings) | Golf Mode Option | Lens Shift | Keystone Correction | Light Source |
|---|---|---|---|---|---|---|---|---|---|---|---|
| BenQ TH671ST | Buy Now! | 1080p (1920 x 1080) | 3000 | 0.69–0.83 | 10,000:1 | 16:9 | Auto; 16:9; 4:3 | No | None | Vertical ±40° | Lamp |
| BenQ LU710 | Buy Now! | WUXGA (1920 x 1200) | 4000 | 1.13–1.46 | 3,000,000:1 (dynamic) | 16:10 | Auto; 16:10; 16:9; 4:3; Real | Yes | None | 2D: H/V ±30° (Corner Fit) | Laser |
| BenQ AH500ST | Buy Now! | 1080p (1920 x 1080) | 4000 | 0.499 | 3,000,000:1 (dynamic) | 16:9 | Auto; 16:9; 4:3; 16:10; Real | Yes | None | H/V ±30° | Laser |
| BenQ AH700ST | Buy Now! | 1080p (1920 x 1080) | 4000 | 0.69–0.83 | 3,000,000:1 (dynamic) | 16:9 | Auto; 16:9; 4:3; 16:10; Real | Yes | None | 3D: H/V ±30° + Rotation ±30° | Laser |
| BenQ TK710STi | Buy Now! | 4K UHD (3840 x 2160) | 3200 | 0.69–0.83 | 600,000:1 (dynamic) | 16:9 | Auto; 16:9; 4:3 | Yes | None | 3D: H/V ±30° + Rotation ±30° | Laser |
| Optoma ZH450ST | Buy Now! | 1080p (1920 x 1080) | 4200 | 0.496 | 2,000,000:1 (dynamic) | 16:9 | 16:9; 16:10; 4:3 | No | None | H/V ±30° | Laser |
| Panasonic PT‑VMZ51 | Buy Now! | WUXGA (1920 x 1200) | 5200 | 1.09–1.77 (1.09–2.21 with Digital Zoom Extender) | 3,000,000:1 (dynamic) | 16:10 | 16:10; 16:9; 4:3 | No | H ±20%, V +44% | H ±35°, V ±25° | Laser (3LCD) |
| BenQ AK700ST | Buy Now! | 4K UHD (3840 x 2160) | 4000 | 0.69–0.83 | 3,000,000:1 (dynamic) | 16:9 | 16:9; 16:10 (Auto Screen Fit) | Yes | None | 3D: H/V ±30° + Rotation ±30° | Laser |
| LG ProBeam BU53RG | Buy Now! | 4K UHD (3840 x 2160) | 5000 | 0.94–1.14 | 3,000,000:1 (dynamic) | 16:9 | 16:6; 16:9; 16:10; 21:9; 4:3 | No | H ±20%, V ±50% | Advanced edge adjustment & warping (4/9/15/25‑point) | Laser |
| BenQ LK936ST | Buy Now! | 4K UHD (3840 x 2160) | 5100 | 0.81–0.89 | 3,000,000:1 (dynamic) | 16:9 | 5 selectable (incl. 16:9/16:10/4:3/Real) | Yes | H ±23%, V ±60% | 3D: H/V ±40° + Rotation ±40°; Warping | Laser |
| EIKI EK-308U | Buy Now! | WUXGA (1920 x 1200) | 6000 | 1.07–1.75 | 10,000:1 | 16:10 | 16:10; 16:9; 4:3 | No | Vertical ±45%, Horizontal ±9% | Vertical ±30°, Horizontal ±15° | 3LCD (Lamp) |
| Optoma ZW350ST | Buy Now! | WXGA (1280 x 800) | 3600 | 0.521:1 | 300,000:1 | 16:10 | 16:10; 16:9; 4:3 | Yes | None | Vertical ±15° | Laser (30,000 hours life) |
Okay, I’ve Got a Short-Throw Projector – Where Do I Mount It?
Once you’ve chosen a short-throw projector, the next step is mounting it at the correct distance to fill Use a Throw Distance Calculator Before You Drill
Before finalising your projector mount, it’s worth double-checking the numbers with a reliable tool. The best option is the ProjectorCentral Throw Distance Calculator:
How it helps:
- Enter your projector model and your screen size.
- The calculator instantly shows the range of mounting distances that will fill your screen.
- You can also see how zoom and aspect ratio settings affect the image.
This tool saves a lot of trial and error. Whether you’re ceiling-mounting, floor-mounting, or testing a temporary setup, it ensures your projector will throw the right size image from the spot you choose—before you start cutting holes or installing mounts.
What If the Projector Is Too Close to the Screen?
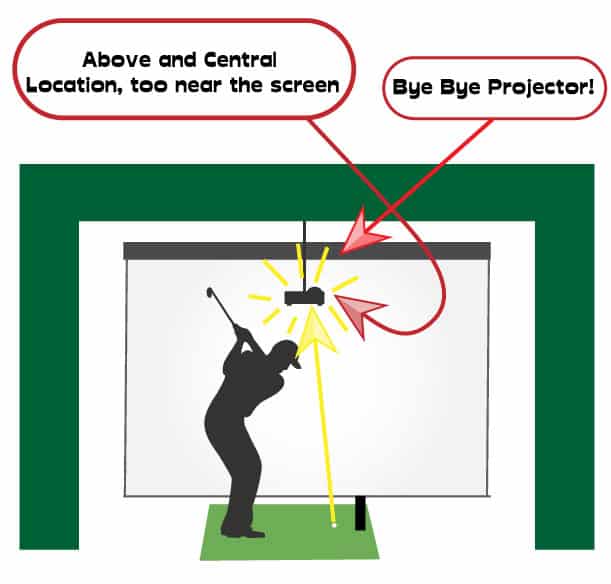
Mounting your projector too close to the impact screen creates two major issues:
- Ball Strike Risk – Ultra-short-throw (UST) projectors, which sit just 1–2 ft from the screen, are particularly vulnerable. A skyed driver shot or mis-hit wedge could easily damage the lens. Even with a protective case, repairs can be costly.
- Obstructed View – A low-mounted UST projector can block part of the image from your hitting position, especially if the housing is bulky.
Possible Solutions:
- Use a sturdy protective enclosure if floor-mounting a UST projector. These are now sold specifically for golf sims.
- Consider your intended setup—if you want to include putting in your simulator, a projector directly in front of the screen can interfere with the roll line.
- Where possible, choose a short-throw projector in the 0.5–1.1 ratio range and ceiling-mount it 8–12 ft from the screen. This reduces shadowing and eliminates strike risk without needing heavy casing.
What If the Projector Is Too Far from the Screen?
Mounting your projector too far back causes two main problems:
- Shadows: If the projector sits behind the hitting area, your body can cast a shadow across the screen. A faint club shadow may be tolerable, but a full 6-foot silhouette will ruin the immersion.
- Oversized Image: With a higher throw ratio and long distance, the projected image may spill beyond your impact screen. This wastes brightness and can blur edges if you digitally scale the image down.

How to Fix It:
- Stick with short-throw ratios (0.5–1.1) so you can mount the projector just behind the hitting area without casting shadows.
- Use your projector’s throw calculator before mounting to make sure the image size fits your screen.
- If ceiling-mounting further back is unavoidable, look for models with optical zoom or lens shift to fine-tune the image without heavy digital distortion.
👉 Bottom line: Mounting too far back can be just as problematic as being too close. Aim to place the projector in that sweet spot of 8–12 ft for a 10–14 ft screen, where the image fills the screen cleanly and shadows stay out of play.
How to Position a Projector in a Limited-Height Golf Simulator Room
Ceiling height is the single most important dimension when planning a golf simulator. If you don’t have the headroom, your build will either stall—or be compromised.
- Absolute minimum height: ~8.5 ft (2.6 m)
- Comfortable height: ~10 ft or more
If your room just clears the minimum, mounting the projector in a traditional above-central position can be risky. You might clip the projector with your swing—or even bump your head when standing up.
In low-ceiling setups, alternatives like floor mounting (with a protective case) or side mounting (with horizontal keystone) become serious options.
Features That Matter Most in Low-Height Rooms
Keystone Correction
- Allows you to square the image even if the projector is off-center.
- Vertical keystone is common; horizontal keystone is typically only found on mid-to-high-end models.
- Be aware: keystone is a digital correction and reduces effective clarity, especially at 4K resolutions.
Lens Shift (Better Option)
- Some modern projectors (e.g. BenQ LK936ST, LU935ST) include optical lens shift.
- Unlike keystone, this physically moves the lens, preserving full resolution and brightness.
- For tight rooms, lens shift is a much better way to adjust the image without degrading quality.
👉 If your room height is limited, plan projector placement first—before you buy. Look for models with horizontal keystone or lens shift and consider floor/side mounting with proper protection. This ensures a rectangular, clear image without compromising safety.
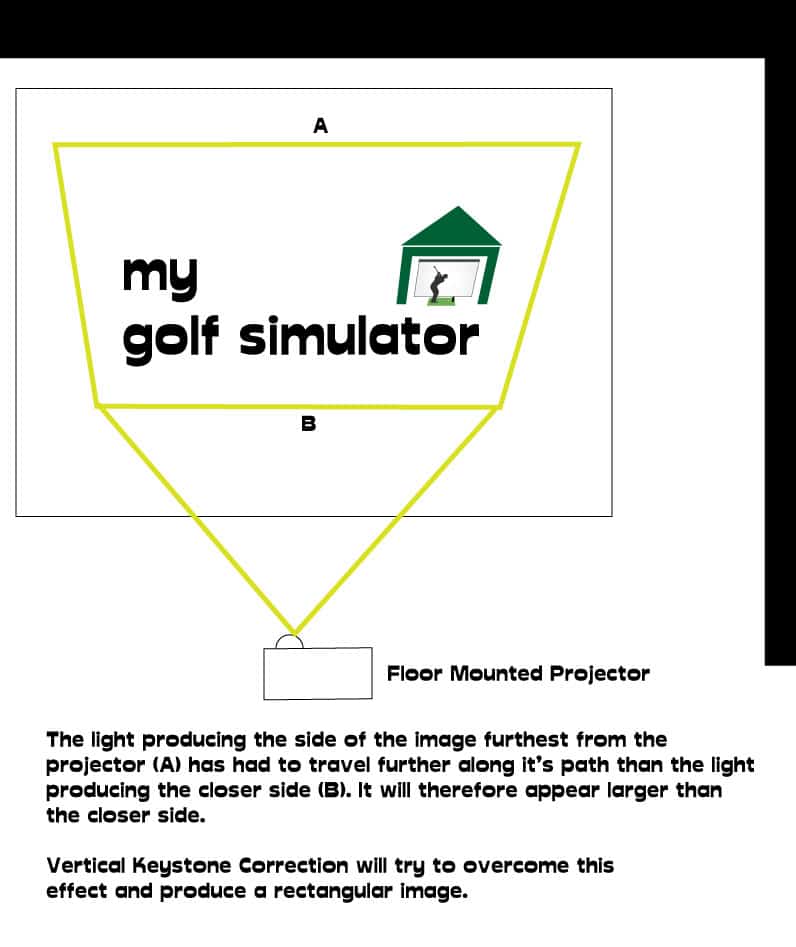
Zoom Lensing
A zoom lens lets you adjust the size of the projected image without moving the projector itself. This can be done manually or digitally, depending on the model.
- Range: Most projectors allow a 10–20% zoom adjustment—enough to fine-tune the image so it perfectly fits your impact screen.
- Trade-off: Excessive digital zoom can reduce image clarity or brightness. Use it sparingly for small corrections rather than as a substitute for proper throw ratio planning.
- Key difference: Zoom lensing adjusts image size, while keystone correction digitally skews the image (up, down, or sideways) to square it off.
How to Avoid Damaging Your Projector
Protecting the projector is as critical as screen size or ceiling height. If you’re even slightly worried about clipping it with your swing, that doubt will creep into your setup and affect your confidence.
Practical Testing Methods:
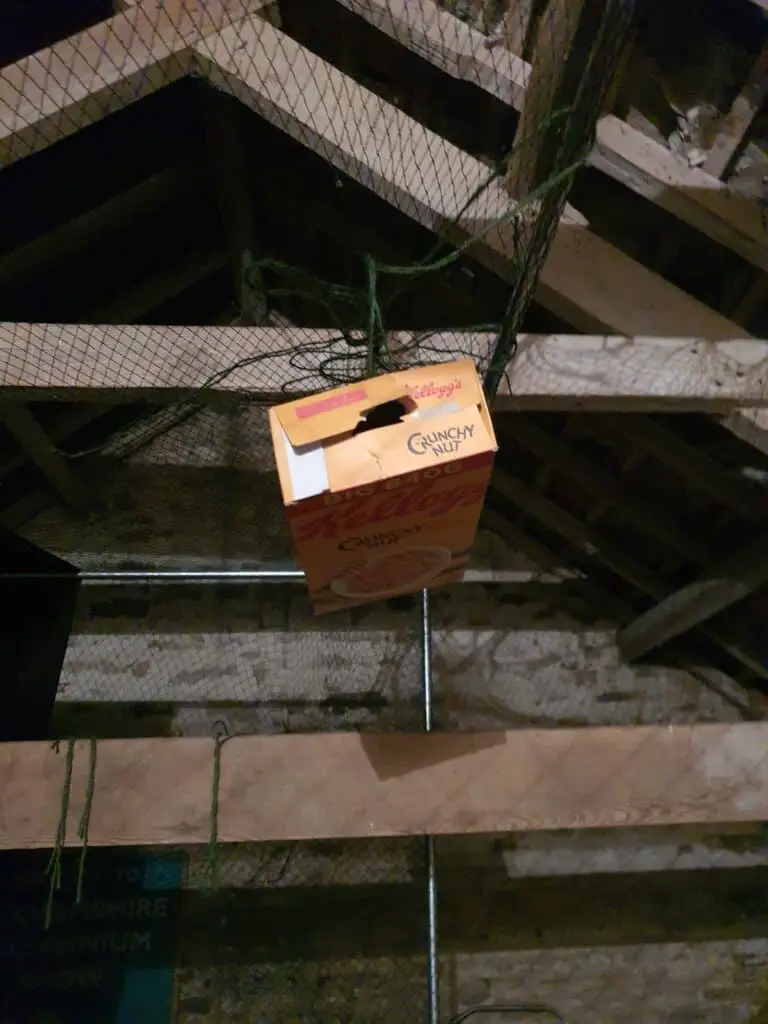
- DIY Test: Suspend a lightweight box or template (roughly projector-sized) from the ceiling in your planned mounting spot. Take full swings—including exaggerated motions or opposite-handed swings—to ensure clear safety margins.
- Modern Alternative (2025): Many projectors (e.g. BenQ and Optoma models) now include 3D room planning tools or online throw calculators that let you model screen size, throw distance, and mount position digitally before you drill. Pair this with a physical swing test for maximum certainty.
👉 Always leave extra clearance for your longest club and highest swing path. A securely mounted, well-positioned projector means you can swing freely without fear of striking your equipment.
Here’s a method I used way back in 2017 when I started experimenting with indoor golf. I created a mounted cereal box setup and moved it into various locations and tested my swing to see if I could swing freely.
I altered my string and box combination, moving it backward 1ft and my hitting mat forward 6 inches. This gave me extra room, I was still an adequate distance from the impact screen and my projector didn’t project shadows onto the screen. I used my Optoma’s zoom lensing to resize the image to where it had been pre-move.
I did my string and box testing again and I couldn’t hit the box even if I tried!
Projector Placement 1 – Above Central (“Position A”)
If your room is tall and wide enough, the ideal projector position is directly above and central to your hitting area. This ensures the cleanest, most rectangular image and maximises clarity without relying heavily on digital corrections.
How High Should You Mount It?
“Above central” doesn’t mean as high as possible. Mounting too high creates the same trapezoidal distortion issues you see with floor mounting, forcing you to use vertical keystone correction (which reduces image clarity).
Instead:
- Mount the projector high enough to stay out of your swing path, but low enough to keep the lens aligned with the centre of the screen.
- A safe rule is to leave at least 12–18 inches clearance above your tallest club swing.
- Test clearance first: use a lightweight box or template at different heights to ensure you won’t strike the projector.
How Far From the Screen?
Your projector’s throw ratio determines how far back it needs to be mounted to produce your desired image width.
Formula:
Throw Distance (ft) = Throw Ratio × Screen Width (ft)
Example:
- Desired screen width: 13 ft (to fit comfortably inside a 14 ft impact screen)
- Projector throw ratio: 0.72
- Required throw distance: 0.72 × 13 = 9.36 ft from the screen
Adjusting for Real-World Constraints
If your ideal mounting position interferes with your swing or room layout:
- Use your projector’s zoom lens (if available) to tweak image size.
- Adjust your hitting position slightly forward or backward to create space.
- As a last resort, accept a slightly imperfect image size—or consider a projector with a different throw ratio better suited to your room.
👉 For detailed guidance on matching room dimensions to projector placement, check out our post: How Much Space Do You Need for a Golf Simulator Projector?
Projector Placement 2 – Above and Off Centre
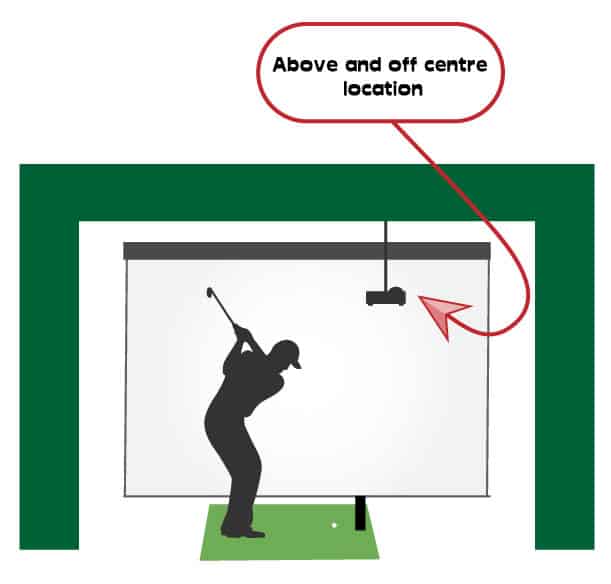
If a perfectly central ceiling mount isn’t possible—because of beams, lights, or your swing path—the next best option is to mount the projector above and slightly off-centre.
Why It Works
- Modern short-throw projectors (0.5–1.1 ratios) paired with lens shift or mild zoom adjustments make this setup highly viable.
- You may need to angle the projector inward slightly, but this won’t usually create the extreme trapezoid distortion seen in full side-mounted placements.
- With premium models, optical lens shift can square the image without losing clarity (better than relying on digital keystone correction).
Key Considerations
- Distance from the screen: Use the same throw ratio formula as for central placement to confirm your mounting point.
- Height: Keep it high enough to avoid club strikes but not so high that vertical keystone becomes necessary.
- Swing clearance: Double-check the off-centre mount still leaves safe space for your longest club.
👉 Position B is an excellent compromise for rooms where a central mount isn’t practical. With the right projector features, you’ll still achieve a clean, rectangular image that looks sharp on your impact screen.
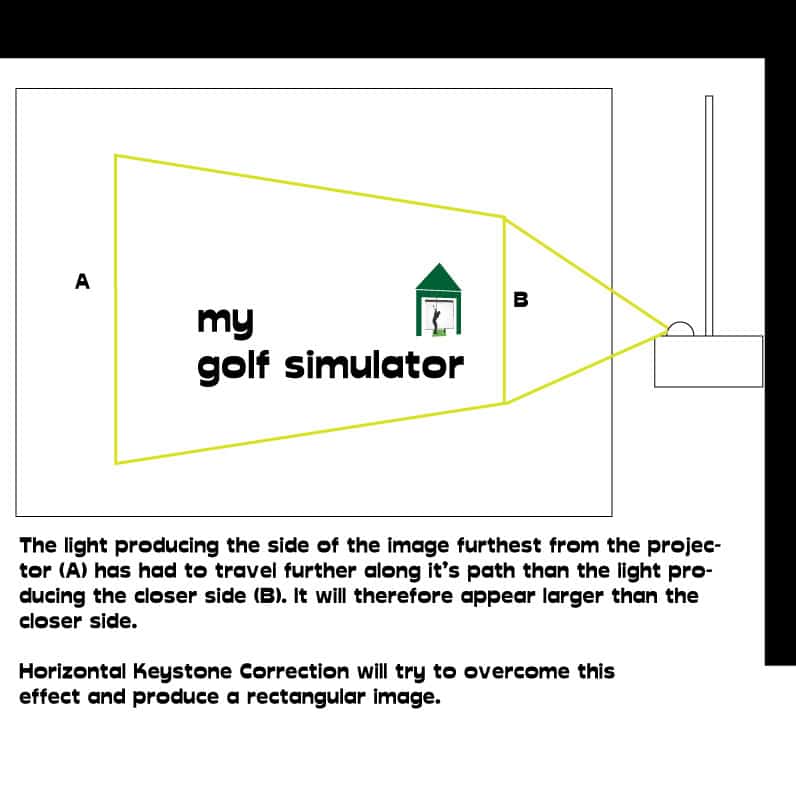
Projector Placement 3 – Side Mounted
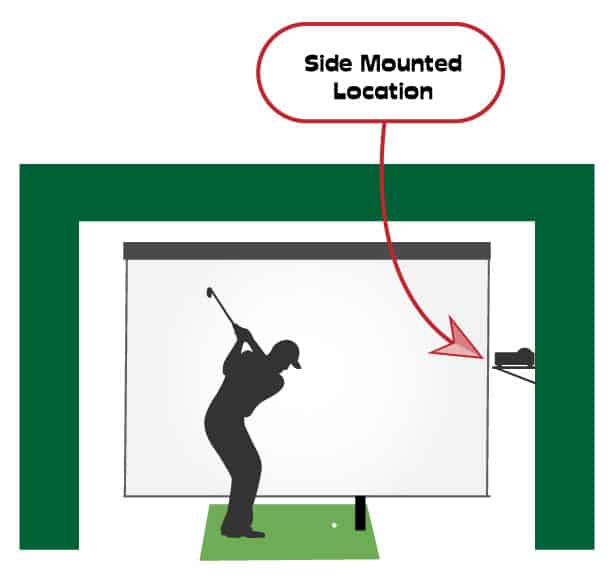
If you’re looking at a side-mounted setup, it usually means you’ve exhausted central and off-centre ceiling options, or your room dimensions make them impractical. That said, side mounting can still be a workable solution.
Benefits of Side Mounting
- Keeps the projector well away from your swing path, removing strike risk.
- Easier cable management, since power and HDMI can run neatly along a side wall.
- Flexibility in height placement, as you can align the lens to the centre of your impact screen without ceiling height constraints.
The Challenges
- A projector mounted to the side will naturally project a trapezoidal image.
- You’ll need horizontal keystone correction (or better yet, horizontal lens shift) to square it into a proper rectangle.
- Keystone correction works digitally, which reduces image sharpness—more noticeable at 4K resolutions.
Is It Worth It?
For many small rooms, side mounting is a price worth paying. If your only alternatives are floor-mounted (risk of damage) or poorly placed ceiling mounts (shadows, obstructions), a side-mounted setup with horizontal keystone may give you the best balance of safety and usability.
👉 If you can, look for a projector with optical lens shift rather than digital keystone. It will deliver a cleaner, sharper image even when mounted off-centre.
Projector Placement 4 – Floor Mounted
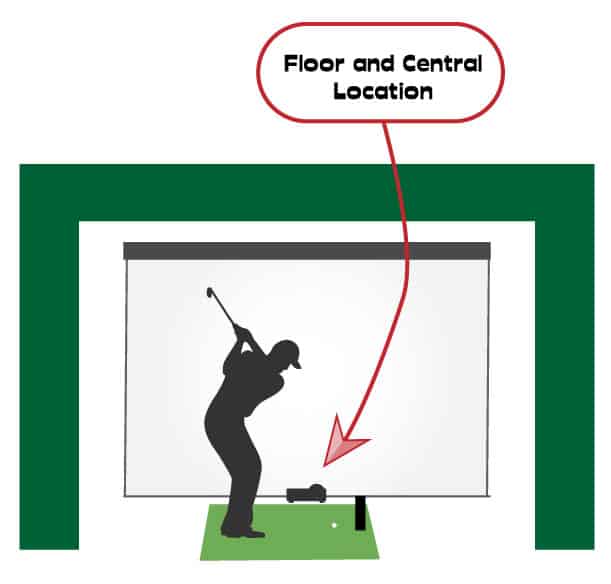
If ceiling or wall space is limited, a floor-mounted setup can be a workable alternative. This approach is becoming more common but comes with important considerations.
Safety First
- Always use a protective enclosure to shield the projector from stray shots. Even a low line-drive or mishit wedge can destroy exposed hardware.
- Commercially available impact-resistant floor enclosures are now designed specifically for golf simulators, offering angled tops to deflect shots safely.
Practical Limitations
- A bulky enclosure may reduce space for other simulator features, such as a putting setup.
- Floor placement often requires vertical keystone correction (or lens shift if available) to square up the image, which can slightly reduce clarity.
- UST projectors can fill large screens from just a couple of feet away, but this also places them directly in line with ball strikes—making protection absolutely critical.
When It Makes Sense
- In rooms with low ceilings where central mounting isn’t viable.
- For temporary or portable setups where ceiling modification isn’t an option.
- If you prefer not to drill or run cables through ceilings.
👉 Floor mounting can work very well, but only if you’re prepared to invest in a robust enclosure and accept some compromises on image flexibility. For most permanent builds, ceiling mounting still remains the gold standard.
Option 5 – No Projector
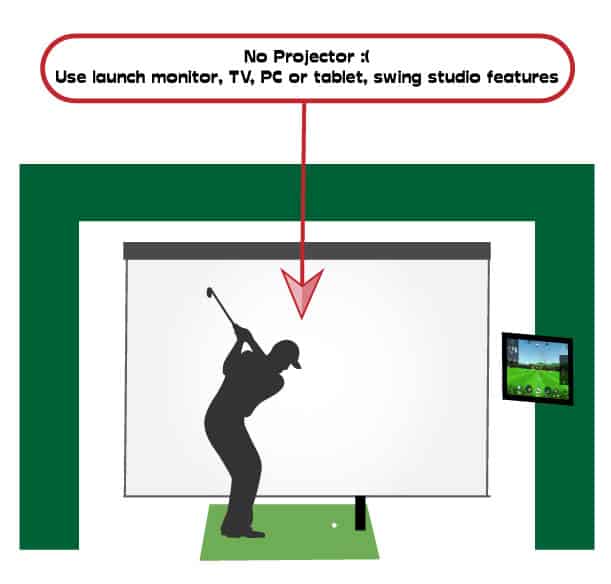
It might feel like a last resort, but you can still create a functional golf practice space without a projector—at least temporarily, until you resolve your mounting or budget challenges.
When to Consider This
- You’ve tried ceiling, side, or floor mounting but still face shadows or strike risks.
- Your room layout makes projector placement impractical.
- You want to start practicing immediately without committing to a complex install.
Alternatives to a Projector
- External Displays: Use a large TV, monitor, or iPad positioned nearby to run your simulator software. This works fine for practice, though aiming is harder without visuals on the impact screen.
- Launch Monitor + Swing Studio: Skip the projector entirely and use your hitting bay with mirrors, swing cameras, and a launch monitor for distance and shot data.
- Putting-Only Setup: Convert the space into an indoor putting green with simulator software running on a side display for feedback.
- Pause and Plan: Continue using your hitting mat and launch monitor while saving or redesigning for a projector-friendly upgrade later.
👉 While a projector delivers the most immersive simulator experience, you don’t need one to benefit from indoor practice. Think of this as a step on your journey rather than the end of it.
My Recommended Projector Mounts
I recommend the SIMBR Universal Ceiling Projector Mount. This is a sturdy, extendable projector mount that should fit all of our recommended projectors. It is for ceiling use and you can adjust the height within a range of up to 25 inches.
Buy it here in the UK and here in the US
I have seen other projector mounts available that you can adjust the position in the length axis as well as the height. One I saw on Youtube was called Skyrail. I have not used this mount but please check it out!
My Recommended Projectors
Check out our list of recommended projectors here! You can read our projector articles all about the features of each projector and how they are relevant to your simulator setup.
Make sure you do your research before buying!

Conclusion and Your Next Steps
By now, you should feel more confident about how to position your projector for the best possible golf simulator experience.
Here’s a quick recap of the process:
- Measure your room dimensions – width, height, and depth will dictate your mounting options.
- Test projector positions safely – use the string-and-box method (or a lightweight template) to ensure your swing clears the projector.
- Match throw ratio to screen size – calculate the correct distance using your projector’s specs or a tool like the ProjectorCentral Calculator.
- Choose the safest position first – central ceiling mounting is ideal, but side or floor setups can work with the right features and protection.
- Future-proof your setup – plan cabling and mounts to support upgrades in projector technology.
👉 If you’re ready to take the next step, explore our detailed guides on projector brightness (lumens), contrast ratio, and keystone correction to make sure you get the right model for your room.
And don’t forget to check out our updated list of recommended golf simulator projectors—complete with the latest short-throw and laser models for 2025.
| Projector Model | Buy Now | Resolution | Lumens | Throw Ratio | Contrast Ratio | Aspect Ratio (Native) | Aspect Ratios (in settings) | Golf Mode Option | Lens Shift | Keystone Correction | Light Source |
|---|---|---|---|---|---|---|---|---|---|---|---|
| BenQ TH671ST | Buy Now! | 1080p (1920 x 1080) | 3000 | 0.69–0.83 | 10,000:1 | 16:9 | Auto; 16:9; 4:3 | No | None | Vertical ±40° | Lamp |
| BenQ LU710 | Buy Now! | WUXGA (1920 x 1200) | 4000 | 1.13–1.46 | 3,000,000:1 (dynamic) | 16:10 | Auto; 16:10; 16:9; 4:3; Real | Yes | None | 2D: H/V ±30° (Corner Fit) | Laser |
| BenQ AH500ST | Buy Now! | 1080p (1920 x 1080) | 4000 | 0.499 | 3,000,000:1 (dynamic) | 16:9 | Auto; 16:9; 4:3; 16:10; Real | Yes | None | H/V ±30° | Laser |
| BenQ AH700ST | Buy Now! | 1080p (1920 x 1080) | 4000 | 0.69–0.83 | 3,000,000:1 (dynamic) | 16:9 | Auto; 16:9; 4:3; 16:10; Real | Yes | None | 3D: H/V ±30° + Rotation ±30° | Laser |
| BenQ TK710STi | Buy Now! | 4K UHD (3840 x 2160) | 3200 | 0.69–0.83 | 600,000:1 (dynamic) | 16:9 | Auto; 16:9; 4:3 | Yes | None | 3D: H/V ±30° + Rotation ±30° | Laser |
| Optoma ZH450ST | Buy Now! | 1080p (1920 x 1080) | 4200 | 0.496 | 2,000,000:1 (dynamic) | 16:9 | 16:9; 16:10; 4:3 | No | None | H/V ±30° | Laser |
| Panasonic PT‑VMZ51 | Buy Now! | WUXGA (1920 x 1200) | 5200 | 1.09–1.77 (1.09–2.21 with Digital Zoom Extender) | 3,000,000:1 (dynamic) | 16:10 | 16:10; 16:9; 4:3 | No | H ±20%, V +44% | H ±35°, V ±25° | Laser (3LCD) |
| BenQ AK700ST | Buy Now! | 4K UHD (3840 x 2160) | 4000 | 0.69–0.83 | 3,000,000:1 (dynamic) | 16:9 | 16:9; 16:10 (Auto Screen Fit) | Yes | None | 3D: H/V ±30° + Rotation ±30° | Laser |
| LG ProBeam BU53RG | Buy Now! | 4K UHD (3840 x 2160) | 5000 | 0.94–1.14 | 3,000,000:1 (dynamic) | 16:9 | 16:6; 16:9; 16:10; 21:9; 4:3 | No | H ±20%, V ±50% | Advanced edge adjustment & warping (4/9/15/25‑point) | Laser |
| BenQ LK936ST | Buy Now! | 4K UHD (3840 x 2160) | 5100 | 0.81–0.89 | 3,000,000:1 (dynamic) | 16:9 | 5 selectable (incl. 16:9/16:10/4:3/Real) | Yes | H ±23%, V ±60% | 3D: H/V ±40° + Rotation ±40°; Warping | Laser |
| EIKI EK-308U | Buy Now! | WUXGA (1920 x 1200) | 6000 | 1.07–1.75 | 10,000:1 | 16:10 | 16:10; 16:9; 4:3 | No | Vertical ±45%, Horizontal ±9% | Vertical ±30°, Horizontal ±15° | 3LCD (Lamp) |
| Optoma ZW350ST | Buy Now! | WXGA (1280 x 800) | 3600 | 0.521:1 | 300,000:1 | 16:10 | 16:10; 16:9; 4:3 | Yes | None | Vertical ±15° | Laser (30,000 hours life) |
Happy Home Golfing!
Projector Mounting FAQs
Projector Mounting FAQs
Q: What’s the best place to mount a golf simulator projector?
- The gold standard is ceiling mounting, centrally above the hitting area. It minimizes shadows, keeps the projector safe, and gives a clean look.
Q: How far should the projector be from the screen?
- Use your projector’s throw ratio and your screen width to calculate distance:
ThrowDistance=ThrowRatio×ScreenWidthThrow Distance = Throw Ratio × Screen WidthThrowDistance=ThrowRatio×ScreenWidth
Example: A 0.7 throw ratio on a 14 ft screen = 9.8 ft from the screen.
Q: Can I mount the projector behind me?
- Not recommended. Your body and club will cast distracting shadows. The projector should be in front of you, above or off-centre.
Q: Is side mounting a projector a good idea?
- It can work in tight rooms, but requires horizontal keystone correction or lens shift, which may reduce image clarity. It’s a compromise option.
Q: Can I floor mount a projector?
- Yes, especially with ultra-short-throw (UST) projectors, but you’ll need a protective enclosure to prevent damage from golf balls. It can also reduce space for putting setups.
Q: What happens if the projector is too close to the screen?
- You risk hitting it with a shot, and the projector housing may block part of your view. UST projectors especially need careful planning.
Q: What if the projector is too far away?
- You may get an oversized image or unwanted shadows from your body and clubs. Always check throw distance before finalizing placement.
Q: How do I test if my mounting position is safe?
- Try the string-and-box method: hang a lightweight box where the projector would go, then swing freely with your driver. If you can clear it safely, the mount should work.
Q: Should I use keystone correction?
- Use it only if necessary. Digital keystone reduces sharpness, especially in 4K. If possible, pick a projector with optical lens shift for better results.
Q: Do I need special tools to plan projector mounting?
- Yes — use the ProjectorCentral Calculator or newer 3D planning tools included in some 2025 projectors (e.g., BenQ).
Mevo Gen 2 Space Requirements
Gray Impact Screens – Pros and Cons
ABOUT THE AUTHOR
Hello! My name is Alex and it is my mission to bring you all the information you need to build your own home golf simulator! I hope mygolfsimulator.com helps you on your journey to better golf at home!
LEGAL INFORMATION
On this site, you'll find articles on all aspects of building a golf simulator. I will also link to other sites where you can buy some of the simulator components. Some of these links may be affiliate links, which means if you click them I gain a small commission at no extra cost to you. This really helps out me and my site so thank you in advance! mygolfsimulator.com and all related social media accounts are property of Awonline LTD.
